
advertisements
_____________________________________________________________________________________________________________________

Reverting a USB drive to its actual size involves removing any partitions, formatting the drive, and potentially restoring its original firmware. If you have a 64GB USB drive that has been modified to appear as a 32GB drive with a Windows bootable image, you can follow these steps to revert it back to its actual size:
Important Note: These steps involve low-level operations on the USB drive, which can result in data loss. Make sure to back up any important data on the USB drive before proceeding
Method 1
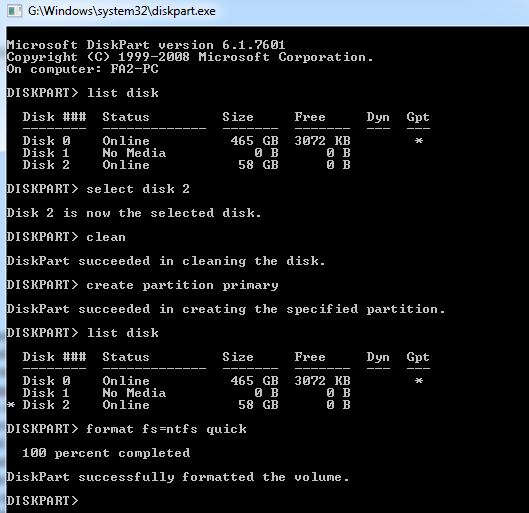
1. Open command prompt. Press Win+R and type CMD and enter
2. Run diskpart

Microsoft DiskPart version 6.1.7601
Copyright (C) 1999-2008 Microsoft Corporation.
On computer: FA2-PC
3.
DISKPART> list disk
Disk ### Status Size Free Dyn Gpt
-------- ------------- ------- ------- --- ---
Disk 0 Online 465 GB 3072 KB *
Disk 1 No Media 0 B 0 B
Disk 2 Online 58 GB 0 B
4.
DISKPART> select disk 2
Disk 2 is now the selected disk.
5.
DISKPART> clean
DiskPart succeeded in cleaning the disk.
6.
DISKPART> create partition primary
DiskPart succeeded in creating the specified partition.
7.
DISKPART> list disk
Disk ### Status Size Free Dyn Gpt
-------- ------------- ------- ------- --- ---
Disk 0 Online 465 GB 3072 KB *
Disk 1 No Media 0 B 0 B
* Disk 2 Online 58 GB 0 B
8.
DISKPART> format fs=ntfs quick
100 percent completed
9.
DiskPart successfully formatted the volume.
DISKPART>
Method 2
1. Backup Data: Before proceeding, ensure you have backed up any important data from the USB drive.
2. Delete Partitions:
Press Win + X and select "Disk Management."
Locate the USB drive in the list of drives.
Right-click on each partition on the USB drive and select "Delete Volume" for each partition.
Ensure that the entire USB drive is unallocated space.
3. Restore USB Drive Firmware (Optional):
Some tools allow you to restore the original firmware of the USB drive, which might have been modified to appear as a smaller size. However, this step can be risky and may not always work for all drives. Search for a firmware restoration tool specific to your USB drive's brand and model.
Caution: Firmware modification is advanced and can potentially damage the USB drive if not done correctly.
4. Format USB Drive:
Right-click on the unallocated space on the USB drive and select "New Simple Volume."
Follow the wizard to create a new partition and format the USB drive. Make sure to use the full capacity of the drive.
5. Restore Bootable Image (if needed):
If you want to restore a bootable image back to the USB drive, use a tool like Rufus or BalenaEtcher to write the bootable image onto the USB drive.
6. Verify Size:
After the steps above, your USB drive should be back to its original size (64GB).
_____________________________________________________________________________________________________________________

0 comments:
Post a Comment